

Trimming your cat’s claws doesn’t have to be stressful for either your pet or yourself. In this practical guide, we explain how to safely and effectively care for your cat’s claws—from choosing the right tools and prepping your cat, to step-by-step cutting techniques and key tips.
Learn how to trim your cat’s claws correctly and stress-free. Check out our practical guide: when, with what, and how to trim claws step by step.
Table of Contents
- When and how often to trim your cat’s claws?
- Necessary tools for trimming your cat’s claws
- Preparing your cat – minimizing stress
- Safe claw trimming technique step by step
- How to handle a cat that won’t cooperate?
- Common mistakes and post-trimming tips
When and how often to trim your cat’s claws?
The frequency of claw trimming for cats doesn’t have a one-size-fits-all answer—it depends on your cat’s age, lifestyle, health condition, and individual predispositions. Indoor cats who spend most of their time at home and lack natural methods of claw wear (like rough outdoor surfaces) usually need more frequent trimming than active outdoor cats. It is recommended to check an adult indoor cat’s claws every 2 weeks, and in practice, trimming is typically done every 3–4 weeks, depending on regrowth rate and how much your cat uses scratching posts. Young, very active cats who run, climb, and scratch heavily may wear down their claws naturally and require less frequent trimming. In contrast, senior, less active, or overweight cats often have longer, more curved claws that grow faster, making systematic checks necessary. Indicators for trimming include claws tapping on hard floors, snagging on blankets, carpets, or clothes, and visibly protruding, curved claw tips when your cat stands or sits. Remember, a cat’s claw consists of layers that shed naturally—if you see “husks” on the scratching post or floor, it’s normal but doesn’t replace trimming when claws are too long. With some cats (especially long-haired ones), claws might be hard to see, so it’s good practice to do a monthly “checkup” of all paws, including the rear, as rear claws can also overgrow and hinder walking or jumping. Also consider your cat’s comfort—if you notice trouble walking on slippery floors, sliding, or excessive “gripping” motions, it might be time for a trim. Outdoor, hunting, and territory-exploring cats usually need less frequent trimming since their claws serve important defensive and utilitarian functions and often wear down naturally; with them, you may only need to trim particularly long claws, especially the dewclaw on the front legs, which does not touch the ground and can quickly curl. Special groups are senior cats or those with orthopedic issues, obesity, or chronic illnesses—they move less, use scratching posts rarely, and their claws grow longer, sometimes embedding in paw pads, causing pain and inflammation. For these cats, checks should be done every 1–2 weeks, with gentle, regular trimming of small claw fragments instead of rare, radical cuts. Regularity is also important for the safety of household members and other animals—shorter, rounded claws mean less risk of painful scratches during play sessions or accidental scratches to children and reduce damage to furniture and fabrics, though they do not substitute a scratching post or behavioral training.
Plan the claw trimming frequency based on observing your cat’s individual lifestyle rather than sticking rigidly to a timeframe. A good approach is to combine claw checks with other regular grooming tasks—once a week, when brushing your cat, gently check each paw and extend each claw by gently squeezing the toes. At this stage, you don’t have to trim every time; just assess length, shape, and check for splitting, discoloration, or cracks, which may indicate health issues (fungal infections, trauma, autoimmune disease). If the claw tip extends noticeably beyond the “line” of the pad (the pad recedes and the claw appears long and “hooked”), it’s time for trimming soon, before excessive curvature or snagging causes painful tearing. In practice, it’s much less stressful to trim small amounts (1–2 mm) more often than to wait for claws to get very long and require major cuts—which increases the risk of cutting the quick (the pink part with blood vessels and nerves), and your cat will start associating the procedure with pain and stress. Also try to match the timing of the trim to your cat’s natural daily rhythm: most are calmer after play, meals or a nap; trying to trim during evening “zoomies” or after a stressful trigger (loud noise, guests, vacuuming) will usually result in resistance and escape. Also note seasonal changes: in winter, with dry indoor air and less outdoor activity, claws may grow faster and require more frequent trims; in summer, with more movement and surface contact, they often wear down faster. If unsure whether it’s time, do a simple test: if your cat stands on a flat, hard surface, look from the side—the claws should not clearly touch the floor, let alone extend past the pads; standing “on tiptoe” means a trim is needed. If you have doubts, consult your veterinarian or feline physiotherapist—one training session with professional demonstration can help you set an optimal routine for your cat and avoid trimming either too rarely or too often.
Necessary tools for trimming your cat’s claws
Properly selected tools are the foundation of safe, stress-free claw trimming—for both the cat and the owner. The most important item is a suitable pair of clippers or a claw trimmer. There are several types available: guillotine, scissors, and mini secateurs. Guillotine-style clippers have a hole through which you insert the claw, cutting it in one swift motion; they work best for experienced users, as they require precise positioning. Scissor-style clippers resemble small scissors with rounded blades and are usually recommended for beginners, as they allow better control of the cut and make it easier to match the clipping angle to the claw’s shape. Secateur models look like mini gardening shears, with sturdy, curved blades suitable for tougher claws found on bigger or older cats, whose claws can be thicker. Regardless of the model, the key is quality—the blade must be extremely sharp, made of durable stainless steel, to ensure a quick, clean cut. Blunt clippers can crush the claw rather than cut it, causing discomfort or pain and increasing the risk of splitting or delamination. Also, check the ergonomics: anti-slip, rubberized handles improve grip stability, reducing hand fatigue and the chance of uncontrolled movement. A handy addition can be a built-in length guard, which helps beginners avoid cutting off too much and damaging the blood vessel (“the quick”). Some owners also use small files or mini rotary files (electric nail files) mainly for smoothing edges rather than shortening; a file helps with claws that tend to snag, but for sensitive cats, the noise or vibration from electric tools can be stressful, so it’s usually better to stick to classic clippers and, when needed, gently smooth sharp ends by hand. Another often-overlooked but important tool is good lighting: a strong lamp, headlamp, or even a well-positioned desk lamp lets you better see the border between the dead claw and pink inner section, especially important with light-colored claws. Good lighting improves precision and reduces the chance of cutting too deep. Also, make sure you have a stable working surface—while not a “tool” per se, a soft, anti-slip mat or a lap-covering blanket makes a big difference for safety and comfort; your cat shouldn’t slip, as this increases tension and may prompt sudden jerks during trimming.
In addition to the clippers themselves, supporting accessories increase safety and help minimize stress in case of the unexpected. First, keep a styptic—alum powder, “styptic powder” for pets, a styptic pencil, or in an emergency, cornstarch or potato starch—within reach. Having this on hand offers peace of mind: if you accidentally cut the quick, you can immediately apply some to the claw tip to stop the bleeding. Also prepare some cotton pads or sterile gauze to clean wounds and compress the styptic. Another helpful group of accessories includes ways to gently immobilize your cat without force—a soft blanket, towel, or the “purrito” (snug but comfy wrapping with only one paw exposed) often works better than any restrictive gadget. Scent-marked mats or a pheromone pad (e.g., sprayed with synthetic F3 pheromone) can also reduce anxiety for some cats. Prepare treats—snacks, hairball paste, or a spoonful of wet food can serve as a “tool” for positive reinforcement and distraction during the procedure itself. For beginners, a magnifying glass or small loupe is handy, especially if your cat has dark claws where the quick is harder to see. For seniors or those with reduced hand function, trimmers with a spring mechanism (less effort needed) or those with a locking feature for easier storage are great choices. Keep all your tools together in a clean bag or small box so each procedure starts calm and organized. Clean clippers after each use and regularly disinfect (using an alcohol-based or pet-safe solution) to reduce bacterial transfer risks, especially since claws may come into contact with the litter box. A thoughtfully assembled set of these simple tools, kept in good condition, makes claw trimming a repeatable, predictable ritual, not a chaotic, stressful emergency.
Preparing your cat – minimizing stress
Minimizing stress before claw trimming starts long before the procedure itself and is based primarily on gradually desensitizing your cat to touch, tools, and the grooming situation. First, make sure your cat associates paw handling and inspection with something pleasant, not just grooming. For several days or even weeks depending on your cat’s character, regularly and gently touch their paws whenever they’re relaxed—when cuddling on the sofa or before bedtime. Don’t grab the whole paw at once—gently stroke from the shoulder or thigh down to the toes, each time awarding your cat with calm words and a treat. If your cat pulls away, don’t force it, just try later, to avoid associating the act with something negative. Once your cat accepts paw handling calmly, gently press the paw pads to extend the claws—mimicking the movement required during actual trimming. The next step is acquainting your cat with the sight and sound of the clippers. Place the tool beside your cat so they can sniff it, then “dry-run” close and open the clippers without touching the paw—so the clicking sound won’t be a surprise. It’s wise to integrate claw trimming into the broader grooming routine—brushing, ear and dental checks, all in short, pleasant sessions always followed by a reward. This builds trust and acclimates your cat to you “doing things” to them, not always unpleasant. Set a calm environment: choose a quiet room your cat feels safe in, close windows and doors to avoid loud noises or outside stimuli. Lay down a familiar blanket or bed on your lap or the table, as familiar textures and scents are soothing. For highly sensitive cats, consider using synthetic pheromone sprays or diffusers well in advance. On day of trimming, keep your cat’s routine unchanged—feed at normal times, allow favorite play, and naps. Avoid trimming right after high-energy play or immediately post-meal, when your cat is either overstimulated or seeking rest. Ideally, trim when your cat is naturally calm, e.g., after a nap or during their usual evening snuggle time.
During preparation and the procedure, the owner’s calmness and consistency are key—cats sense our emotions and can be affected by our stress. Speak to your cat softly, with a gentle steady tone. Avoid sudden movements and nervous gestures, even if your cat struggles. For nervous or previously traumatized cats, you may need to break up claw trimming into tiny steps—on one day just touch the paws and reward, next day place the clippers on the claw but don’t cut, only after several sessions trim a single claw. For many cats, the “one or two claws at a time” strategy is more effective than trying to trim all at once—the sessions are shorter and your cat remains calmer. If your cat hisses, flicks tail, flattens ears, or tries to escape, better stop and come back later rather than forcing it. Avoiding excessive restraint, wrapping cats tightly without prior training, or using force may cause intense fear or even defensive aggression; save those techniques as a last resort or use only after consulting your vet or a feline behaviorist. Rewards play a big role—treats, hairball paste, favorite wet food, or play immediately after a successful cut build positive associations. It’s important to reward calm behavior right away, not only after the entire process. If there’s more than one person in your household, get a helper to serve as “the positive association person”: one gently holds and trims, the other feeds treats or pets, distracting the cat. For extremely sensitive cats or those with health issues, consult a vet for a tailored grooming plan; sometimes supplements or specific counter-conditioning techniques are recommended. The goal of this whole process is to make claw trimming a predictable, brief part of the daily routine, not a major source of fear—which demands owner patience, gentleness, and consistent positive experience-building around paw touch and handling.
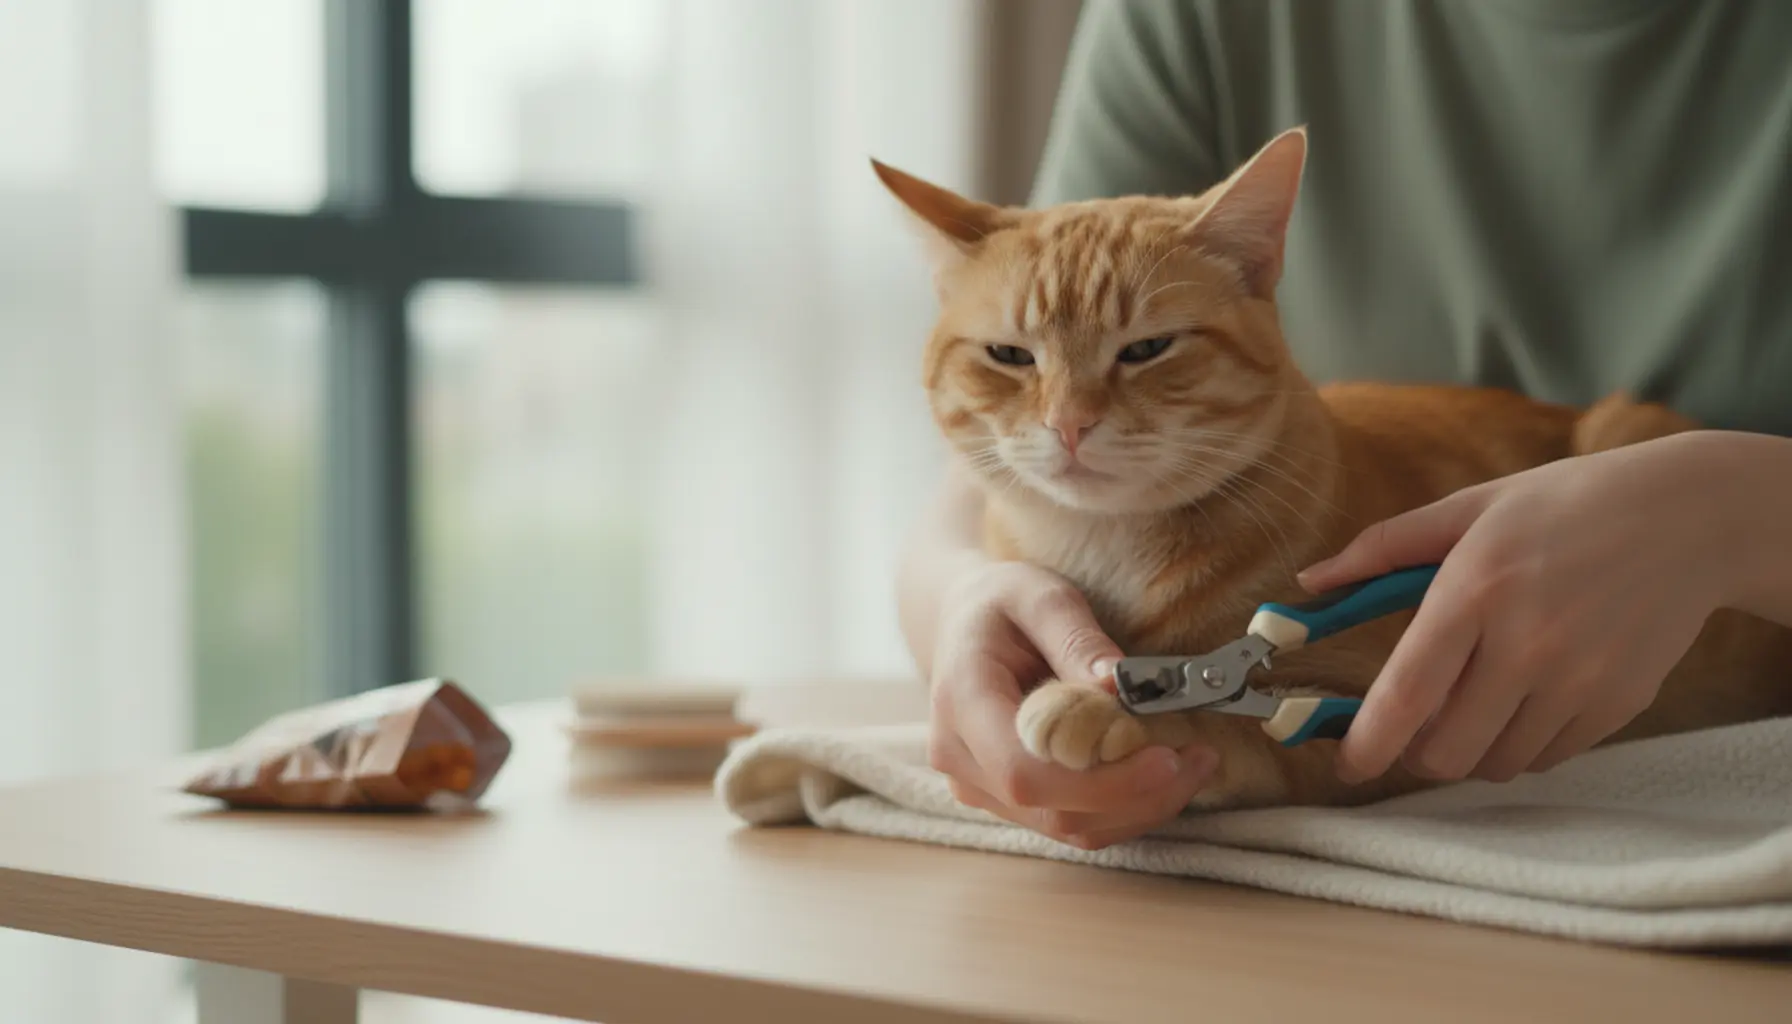
Safe claw trimming technique step by step
Safe claw trimming requires careful planning, a calm atmosphere, and adherence to key technical rules. Start by preparing your setup—a stable table, desk, or lap covered with an anti-slip mat or towel, so your cat feels secure. Have all accessories handy: claw trimmer, good lighting (desk lamp, headlamp), cotton pads, styptic, and treats. Make sure the room is quiet without sudden noises or distractions from other animals. Let your cat rest first—pick a time after play or food, when they’re relaxed and drowsy. Gently place your cat in position and calmly pet their favorite spots (head, neck). If the cat is anxious, do not restrain harshly—give them a moment to settle; for very nervous cats, a helper can gently hold and soothe. Next, move to the paws—start with the one your cat guards least (usually the front paw on your dominant hand side), gently but securely grasping it. Place your thumb atop the paw and index finger beneath to steadily control claw extension. To extend the claw, gently squeeze the paw pad—not too much force, just enough to reveal the tip. With good lighting, you’ll see the clear claw section and the pink “quick” (containing nerves and blood)—never cut into the pink. With light-colored claws, the boundary is obvious; for dark claws, trim cautiously, removing only a tiny amount.
Hold the trimmer in your dominant hand, perpendicular to the claw for a clean, split-free cut. Don’t cut “from above” at a sharp angle—better to cut parallel to the natural claw curve, removing only the hooked, thinnest tip. For beginners, trim just 1–2 mm at a time, checking distance to the quick after each snip; leave at least 2–3 mm of clear claw before the pink part. It’s safer to cut too little than too much—cutting into the quick is painful, causes bleeding, and may create a long-lasting bad association. If you accidentally nick the quick, promptly press a little styptic or pet-safe powder to the claw tip, soothe your cat, and take a break; don’t panic or raise your voice, as your cat will link the procedure with negative emotion. After trimming the first claw, reward your cat with a treat and a short break—this teaches your cat that cooperation pays off. Move to the next claw, repeating the sequence: gentle extension, assessing length and quick, then a quick, resolute cut. Avoid “nibbling” or repeatedly clipping the same spot, as it stresses the cat and may cause tiny cracks. Most owners start with front claws, but don’t skip rear ones—they too may overgrow, especially in less active or older cats. Don’t forget the “thumb” (dewclaw) on the front legs, which doesn’t touch the floor and thus doesn’t wear naturally—these overgrow and curl most frequently. Watch your cat throughout—if they begin to struggle, pant, meow loudly, or swish their tail, pause and don’t force more trims; in difficult cases, spread claw cutting over two or three short sessions on different days, rather than erode trust. After trimming, let your cat go free—don’t restrain them or correct your grip once they’re done. Finally, inspect all paws to ensure nothing was missed and edges are smooth—no jagged bits to snag or cause discomfort when walking or scratching. This builds a calm, predictable routine where your cat learns their paws are respected and that claw trimming is a short, painless part of life—not a stressor.
How to handle a cat that won’t cooperate?
Unwillingness to have claws trimmed is very common in cats, usually caused by fear, distrust, and negative past experiences. Before resorting to “forceful” methods, try to pinpoint at which stage your cat protests: paw handling, clippers’ presence, or the first snip. Watch for body language—flattened ears, swishing tail, tense muscles, growling, hissing—and stop before the cat escalates to scratching or biting. For sensitive cats, break the process into small steps with rewards for each slight improvement: tolerating a touch, holding, extending a claw, touching with the trimmer but not cutting, then trimming one claw. Never punish or yell at an aggressive cat—you’ll only heighten their stress and reinforce bad associations. Instead, calmly back off, let your cat hide or rest, and try again later, starting from an easier stage. For tough cases, establish a predictable routine to signal what’s coming—set up the mat, get treats out, play calming music. Over time, this ritualization helps your cat feel less threatened. Linking trimming to things your cat enjoys—stroking a favorite spot, hairball paste, lick mats, or a post-session wand toy game—helps cooperation. Many cats are calmer on higher surfaces (table, counter, washing machine) or on anti-slip mats than on a slippery floor—these feel more stable. Some cats benefit from the “kitty burrito”—gentle wrapping in a blanket or towel with only the working paw exposed. Do so carefully, not too tight, so your cat doesn’t feel trapped, which can cause panic. For noise-sensitive cats, use the quietest trimmer possible—and when introducing the tool, snap it in the air near the paw to accustom your cat to the sound. For especially anxious cats, try splitting the trimming over several days—trim two claws per day, so your cat never feels overwhelmed.
For extremely resistant cats, additional stress-reduction and safety techniques help. Getting a helper to calmly hold and distract (with treats or toys) while you focus on clipping works well. The helper should be composed and patient, avoiding abrupt moves or tight grips, which can worsen resistance. Pheromone sprays or diffusers in the room for 15+ minutes before the session can visibly reduce anxiety for some cats. If every attempt ends in a fight despite training, consult a veterinarian or behaviorist—they’ll check for pain-related causes (arthritis, injury, ingrown claws) and may devise a personalized plan. In extreme, absolute-need scenarios (embedded claws, chronic illness, self-injury risk) and if safe cooperation is impossible, your vet might suggest short-term sedatives during trimming—always a last resort, not a home routine. Also, consider alternatives: if your cat outright rejects trimming, enrich their environment with various scratching posts, replacing them when worn, to maximize natural claw wear. Try vertical, horizontal, cardboard, sisal posts at strategic home points, like favorite observation spots and travel paths. Longer, active play sessions with wand toys or balls help dissipate excess energy and lower overall excitability, making grooming sessions easier. Consistency is key—even if you succeed in trimming just one claw in a session, gradual, steady progress beats an exhausting “big battle” every few months after which your cat won’t let their paws be touched for a long time.
Common mistakes and post-trimming tips
Cat owners often make several recurring mistakes during claw trimming, not only increasing pet stress but also risking pain, bleeding, and lasting aversion to future trims. One of the biggest mistakes is cutting too deeply—into the pink, vascular quick—often when trying to “get it over with for longer” instead of trimming small amounts more often. The result is pain, bleeding, and a strong negative reaction, making the cat associate the procedure with danger. Another problem is using dull or poor-quality tools: instead of a clean cut, there is crushing, splitting, or microcracks, which can cause walking discomfort and encourage excessive paw licking. Trimming “by force” is also common—owners restrain protesting cats on their lap or wrap them up without gradual preparation, making cats associate paw handling with strong immobilization, raising anxiety and future resistance. Rushing through to “get it done,” skipping breaks, stress signals (tail swishes, dilated pupils, panting, vocalizing), or failing to split the job over several attempts is likewise unhelpful. Avoid trimming claws at the wrong time, e.g., when your cat is stimulated, just played, is hungry, startled by guests or loud noises—stress levels are already high and trimming success drops. Poor hygiene is another error: dirty, claw-dusty clippers can become bacterial traps, especially if paired with micro-injuries, raising the risk of inflammation. Some owners neglect rear claws, focusing only on the front, but for some cats (especially older or overweight), overgrowth and embedding in paw pads commonly happen at the back. Finally, insufficient aftercare is a mistake—assuming “no bleeding means everything is fine,” rather than watching if the cat limps, obsessively licks a paw, holds it up, or flinches at touch afterwards.
Proper post-trimming care and habits can minimize mistakes’ effects and foster positive associations. After trimming, calmly inspect each paw in good light—check for even cuts, smooth edges, any oozing at the base, or redness around the nail. If there’s minor bleeding, stay calm, gently compress with a pad, and use a pet-safe styptic—don’t squeeze the paw tightly or fuss over the claw, as this will only add discomfort. For several hours watch your cat—short licking is natural, but if the animal obsessively licks a spot, limps, hides, or refuses to walk, examine more closely and consult your vet if needed. After trimming, provide a calm, predictable environment: no loud noises, energetic play, or forced cuddling. End the session with a brief, pleasant activity your cat chooses—a favorite treat, gentle stroking in a “safe” spot (under the chin, behind the ear), or a short, gentle wand toy play. This way, your cat will remember something nice follows paw handling. Between trims, regularly check claws—even once a week, even if no cutting is needed—so your cat gets used to exams and gentle pad pressing. Keep your tools in good order: wipe blades dry after use and disinfect them regularly with a pet-safe product, letting them air dry fully before next use. Ensuring a stable, non-slip surface (like a towel on the table) and a comfy position for your cat reduces unexpected jerks and possible injuries. If, after several tries, your cat is still highly anxious, consider a behaviorist visit or ask your veterinarian for training—sometimes just a different grip, another clipper, or the right training with rewards can transform your cat’s experience of claw care.
Summary
Regular, proper claw trimming is crucial for your cat’s health and home safety. Using the right tools, proper technique, and ensuring your cat’s comfort can minimize stress during the procedure. Remember to accustom your cat to paw handling and trim claws in a calm environment. If your cat struggles, apply proven tips from this guide or seek a behaviorist’s advice. Avoid common mistakes and pay attention to your cat’s needs so that claw care is easy and safe.